
Whipping cream machine chargers are essential tools for anyone looking to create perfect whipped cream quickly and efficiently. These small devices, typically filled with nitrous oxide (N2O), help turn cream into a light, fluffy topping for desserts, beverages, and more. Whether you’re a professional chef or a home cook, mastering the use of a whipping cream machine charger can elevate your culinary creations. In this ultimate guide, we’ll explore everything you need to know to use whipping cream machine chargers effectively.
What is a Whipping Cream Machine Charger?
A whipping cream machine charger by Nang Delivery is a small metal cylinder that contains pressurized nitrous oxide gas. The charger is designed to fit into a cream whipper (also known as a whipping cream machine), where it is used to release the nitrous oxide into the cream. The gas dissolves into the liquid cream, causing it to form small bubbles and expand, creating the fluffy whipped cream texture. Most chargers are 8 grams, which is the perfect amount to whip around 250 ml (about 1 cup) of cream.
Step-by-Step Guide to Using a Whipping Cream Machine Charger
Using a Nang Deliverywhipping cream machine charger is straightforward, but there are a few key steps to ensure optimal results. Here’s a simple step-by-step process:
-
Prepare the Whipping Cream
Start by selecting high-quality cream with a fat content of at least 30%. Cream with a higher fat content will create a richer, more stable whipped cream. Pour the cream into the canister whipping cream machine, leaving enough space at the top for the gas to circulate.
-
Add Flavoring (Optional)
If you’d like to add flavorings like sugar, vanilla extract, or any other sweeteners, mix them into the cream before sealing the canister. This is the perfect opportunity to customize your whipped cream to your liking.
-
Insert the Charger
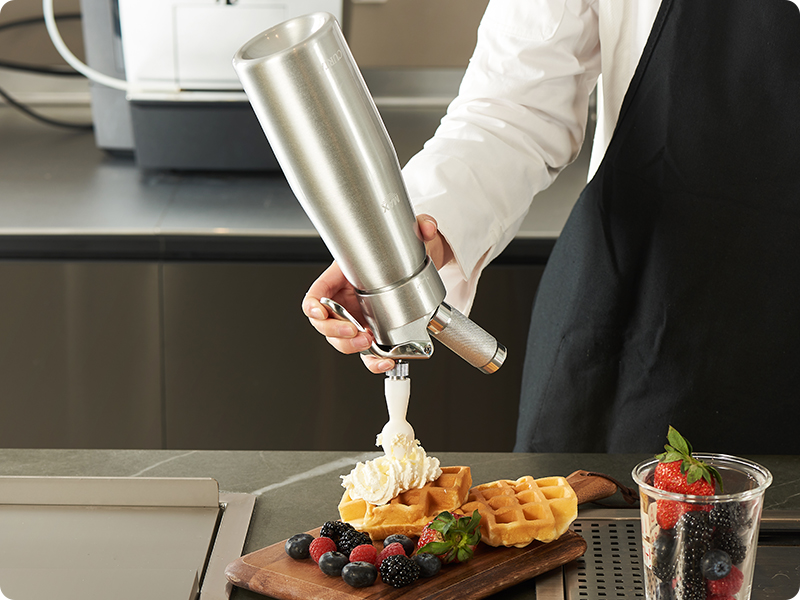
Take a fresh whipping cream charger and place it into the charger holder. Carefully screw the charger holder onto the top of the canister. When the charger is correctly inserted, you’ll hear a hissing sound as the nitrous oxide is released into the canister, mixing with the cream.
-
Shake the Canister
Once the charger is released, shake the canister vigorously for about 10-15 seconds. This action helps ensure that the gas is fully incorporated with the cream, resulting in a smooth and fluffy whipped cream. The more you shake, the fluffier the whipped cream will be. For thicker whipped cream, give the canister a few extra shakes.
-
Dispense the Whipped Cream
After shaking, remove the charger holder from the canister and attach your desired nozzle. Hold the canister upright and press the handle to dispense the whipped cream. You’ll get a perfect, airy texture every time.
-
Clean the Whipping Cream Machine
After using the whipping cream charger, it’s important to clean the machine thoroughly. Remove the charger holder, rinse the canister with warm water, and clean the nozzle with a brush. This will prevent any cream buildup and ensure that your whipping cream machine stays in good condition.
Whipping cream machine chargers are invaluable tools for creating the perfect whipped cream with ease. By following the steps outlined in this guide, you can ensure that your whipped cream is consistently light, fluffy, and delicious. Whether you’re making a simple topping for cakes or adding flair to your favorite beverages, using a whipping cream machine charger will save you time and help you achieve professional quality results every time.


Comments